If you are just about to purchase a new electric vehicle charging station, you might be interested to know that you can build your very own EV charger using a little Arduino hardware. A step-by-step tutorial video has been created by Pedro Neves taking you through the process of constructing a functional and safe EV charger using an Arduino Uno and a custom shield. By following the steps outlined in this article, you’ll gain a deeper understanding of the necessary components, assembly procedures, and programming required to bring your own EV charging station to life.
Prioritizing Safety
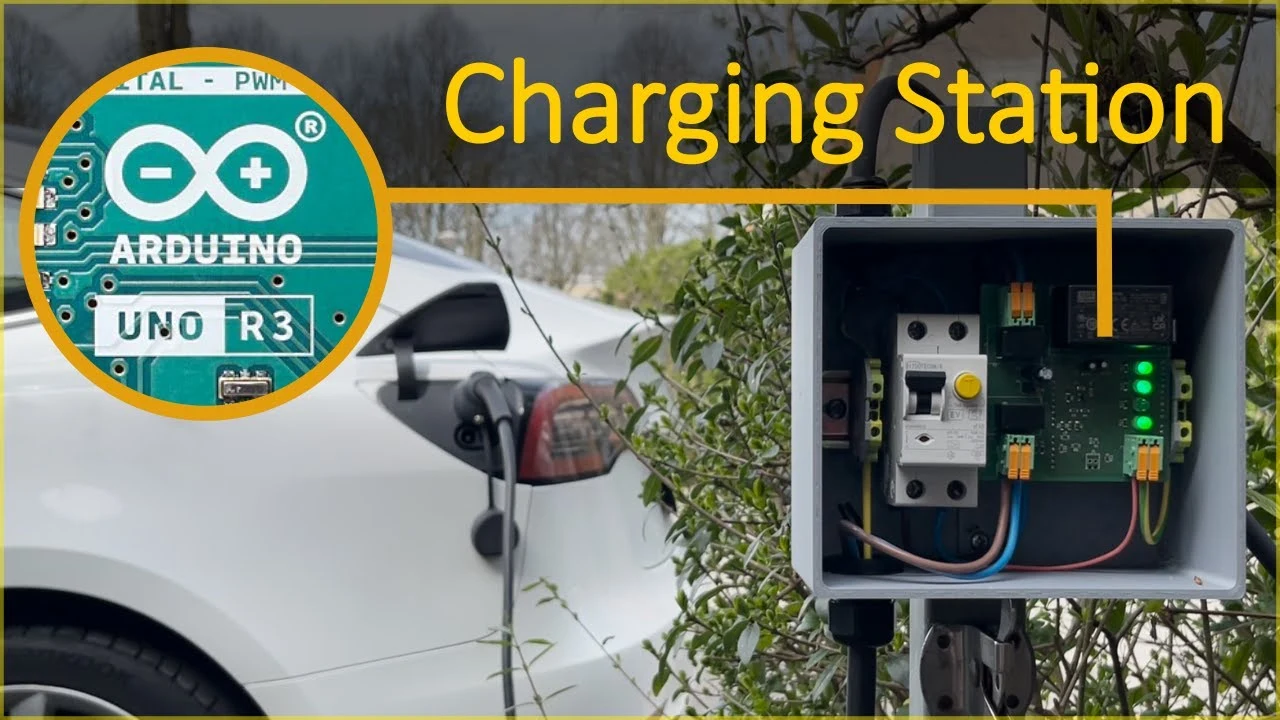
When dealing with electrical systems, safety is of utmost importance. To ensure the protection of both the user and the equipment, your charging station will incorporate a Residual Current Breaker with Overcurrent (RCBO). This critical safety feature prevents electric shocks and minimizes the risk of fires, guaranteeing the longevity and reliability of your charger.
DIY Arduino EV Charger
The Arduino Uno is a versatile microcontroller that serves as the brain of your charging station. To interface with the Arduino Uno, you’ll need a custom shield that houses essential components such as relays, transistors, power supplies, and an operational amplifier. These components work harmoniously to ensure efficient power management and a smooth charging process.
- Arduino Uno microcontroller
- Custom shield with relays, transistors, power supplies, and an operational amplifier
- USB cable for programming the Arduino
- Laptop with Visual Studio Code and PlatformIO extension installed

Programming Your Charger
To bring your EV charging station to life, you’ll need to program the Arduino Uno. Connect the Arduino to your laptop via USB and use Visual Studio Code with the PlatformIO extension for a seamless coding and debugging experience. The charger’s source code is readily available on GitHub, allowing easy access, version control, and the opportunity for community collaboration.
- Connect the Arduino Uno to your laptop via USB
- Open Visual Studio Code with the PlatformIO extension
- Access the charger’s source code from the GitHub repository
- Customize and upload the code to the Arduino Uno
Assembling Your Charging Station
Assembling your EV charging station requires meticulous attention to detail. The components are securely mounted on a DIN rail within a protective enclosure, ensuring both stability and safety. Follow the comprehensive wiring instructions and strategically place each component to optimize functionality and minimize potential hazards.
Key steps in the assembly process:
- Mount the components on the DIN rail
- Carefully follow the wiring instructions
- Ensure proper placement of components within the enclosure
- Double-check all connections for accuracy and security
Rigorous Testing and Validation
Before your EV charging station is ready for real-world use, it must undergo thorough testing to validate its performance. Begin with basic power tests to ensure the charger powers on correctly. Next, connect the charger to an EV simulator to verify its functionality in a controlled environment. Finally, test the charger with an actual electric vehicle to confirm its compatibility and reliability in real-world scenarios.
Testing stages:
- Basic power tests
- EV simulator testing
- Real-world testing with an electric vehicle
Future Enhancements
The design of your DIY EV charging station by Pedro Neves takes into account the possibility of future upgrades. One notable enhancement is the integration of current measurement capabilities. By adding this feature, you’ll be able to monitor the charging process in greater detail, providing valuable insights into the efficiency and safety of your charger. This upgrade paves the way for further optimizations and improvements down the line.
Building your own low-cost EV charging station using Arduino is not only a practical project but also an incredible learning opportunity. It allows you to delve into the world of electronics and electric vehicle technology, gaining hands-on experience in Arduino programming and hardware assembly.
Video & Image Credit: Pedro Neves
Source : AB
Filed Under: Guides
Latest TechMehow Deals
Disclosure: Some of our articles include affiliate links. If you buy something through one of these links, TechMehow may earn an affiliate commission. Learn about our Disclosure Policy.